Overview
Extract your media files metadata and store it in your backend storage.
Metadata extraction is never been easy. Just install the stand-alone phar file in your server, and run this as a cron job.
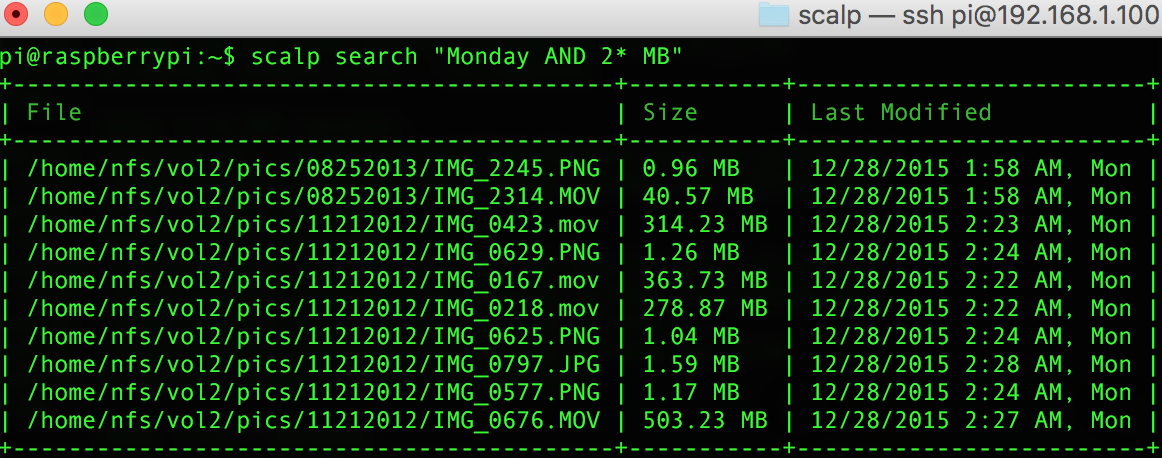
Scalp - a command-line utility can certainly help you out in data-mining and analyzing your digital media files in large-scale. This tool is for developers who wants an easier way to manage massive, unstructured media files and is meant to be integrated with larger system (CDN, media publishing sites, subscription-based services like Netflix and alike.)
Features
- > Extract EXIF and other basic metadata information from your media files.
- > Store the extracted data to to multiple backend storage and query it from there
- > Thumbnail creation
- > Easily visualize and create Dashboards and reports using Kibana
Installation
Scalp can be easily installed globally in your machine, it is just a single phar archive which packs everything you need. However, it has a few requirements to run:
- PHP 5.5 or greater
- lib-curl, ext-exif, ext-gd, ext-curl, ext-json extensions enabled
- ElasticSearch Server
For Debian/RHEL OS
wget https://downloads.buonzz.com/scalp.phar
sudo mv scalp.phar  /usr/local/bin/scalp
chmod +x /usr/local/bin/scalp
For Mac
curl -o scalp.phar 'https://downloads.buonzz.com/scalp.phar'
sudo mv scalp.phar  /usr/local/bin/scalp
chmod +x /usr/local/bin/scalp
Currently, Windows is not supported yet, as this tool is largely geared towards use for long-running tasks and cron-based jobs. You can however use Vagrant to spin a little Ubuntu machine in your computer and mount your files there, this way you can still run Scalp on your Windows machine.
You can verify the scalp is installed properly by typing this command while in any folder:
scalp -VThis should output something like
Scalp Metadata Extraction Tool by Darwin Biler version v2.x.xCongrats! you just had installed Scalp in your computer
Configuration
To index a set of media files, you just need to place a configuration file in the folder (usually the top folder on where your images/videos is stored) you need to be indexed. The configuration file should be named .env . A sample .env file looks like below:
INPUT_FOLDER=./
OUTPUT_FOLDER=dist
All these configuration options is optional! Yes, you can even just execute scalp without configuration file at all, but that is assuming you are ok with the default values. When you did not specify a certain value, it will use the default value. This are the default values of each setting and its brief description
| INPUT_FOLDER | path to folder you want to extract information from | current folder |
| OUTPUT_FOLDER | where to write json data and thumbnails | ./dist (this will be created automatically) |
| THUMB_PERCENT_RESIZE | Used when creating thumbnails, this should be between 10-100, the images will be resized with this percent value | 10 |
One other option is to define these variables in your .bash_profile or .bashrc files, this is when writing .env files to media folder is not possible ( read-only NFS mounts for example ).
Indexing Files to ElasticSeach
An Index in ElasticSearch is the equivalent of database in RDBMS like MySQL or SQL Server. The indexing process means extracting the metadata information of your media files and store it to an Index in ElasticSearch.
Why this is very important is, you would normally would not like to constantly re-extract the same information from your media files everytime you need to search something. For example, if you would like to search for all videos which has length of 4 minutes, instead of querying every video files each time this query is needed we just extract all the video length during indexing process and store those to ElasticSearch. Everytime a user asks a query related to video length, this info is searched on ElasticSearch, instead of analyzing every files. This provides an enormous amount of speed and scalability in your infrastructure since ElasticSearch caches the information and can handle really huge amount of queries.
Once you have the configuration worked out, indexing is as simple as going to the location of that config file and type
scalpBasically, it will try to detect first if the index is already existing in your ElasticSearch server, if it is not, it will try to create the index and field mappings. Once the mapping is created, it will start scanning the files in INPUT_FOLDER for media files (it will skip over non-media contents such as csv, doc, xls etc). The good thing about Scalp is, it doesn't require you to structure your folders in any particular order, you can retain whatever the current structure of your folder, making it ideal for messy files wherein miscellanous files is intermixed with other non-media files.

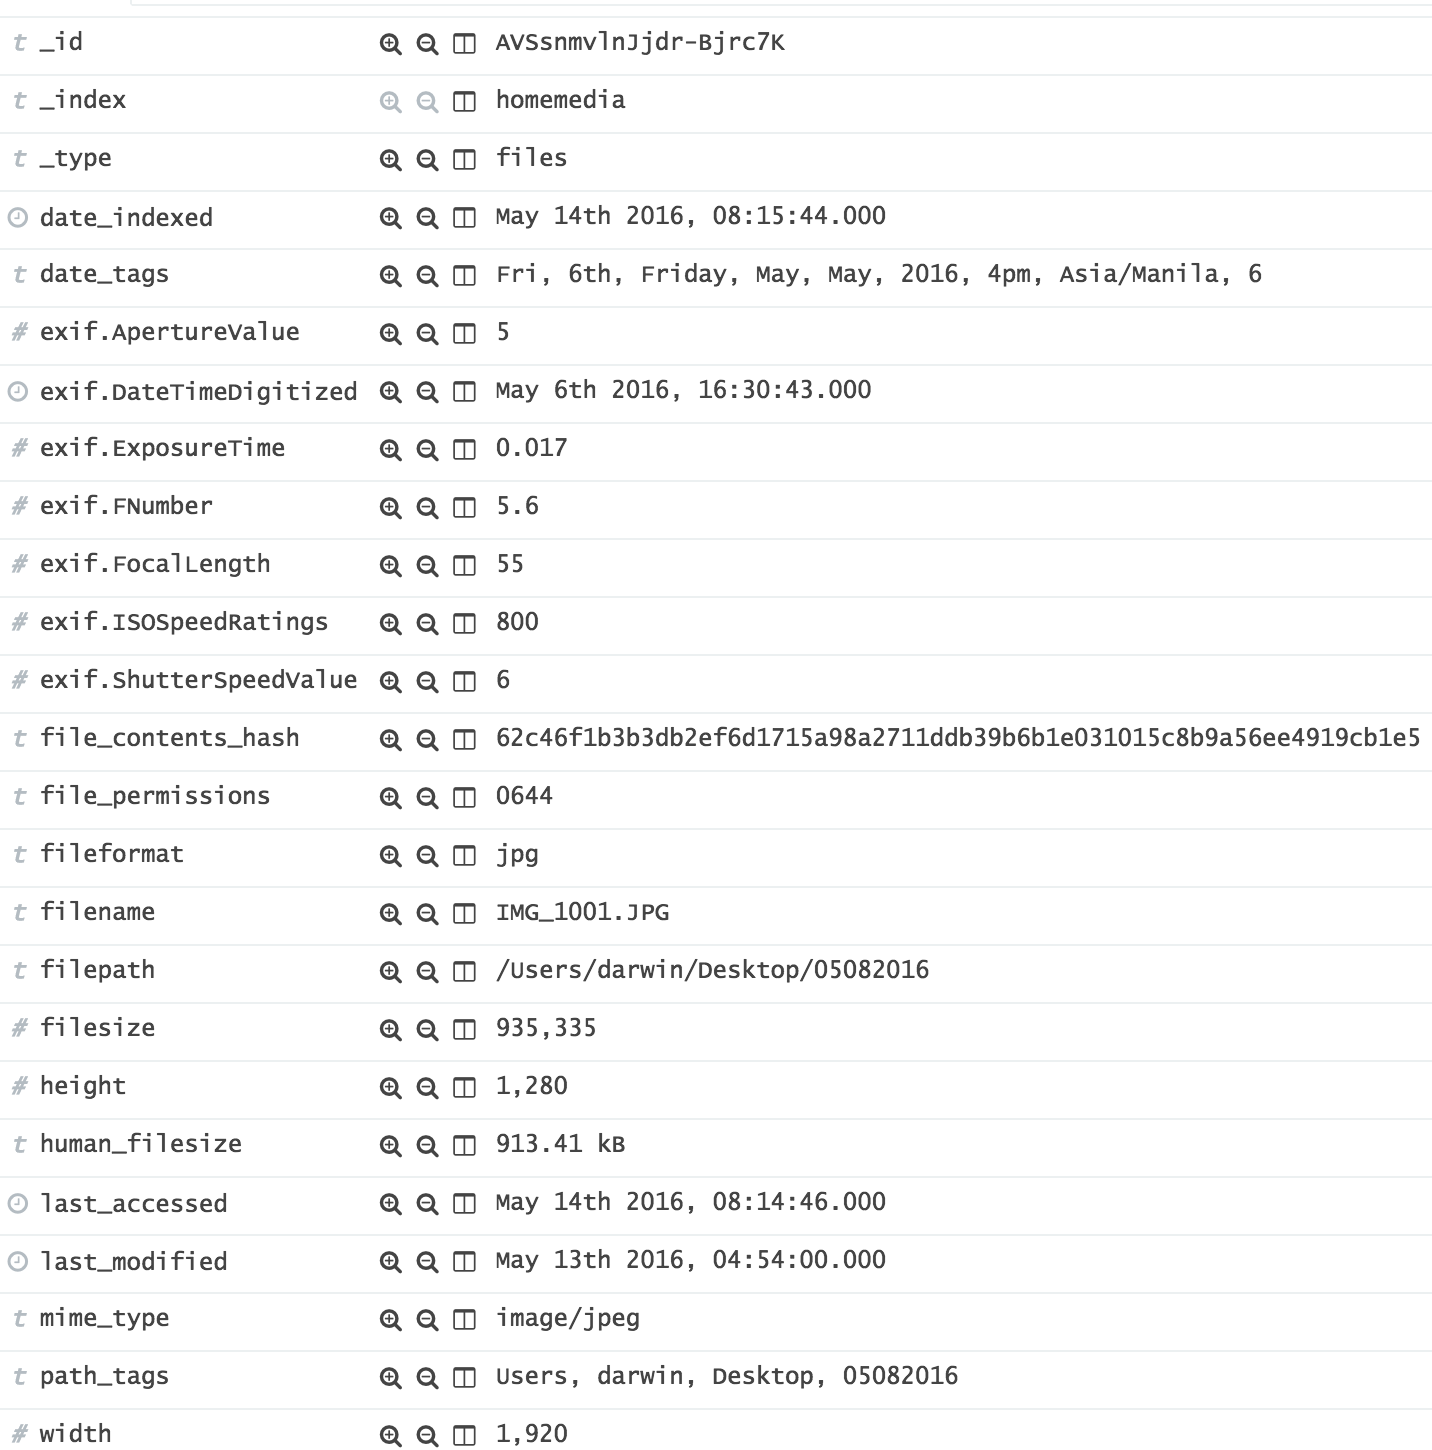
For each file, it will try to extract the following information
Once indexed, this is fully available from within ElasticSearch and you can do whatever you want (given that you know how to query ElasticSearch). There might be many other additional fields added by future versions of Scalp which makes it even more powerful.
Re-indexing
When a certain file is added or re-uploaded/changed, we might need to perform re-indexing, so that the data in ElasticSearch will be up-to-date. One great feature of Scalp is, its ability to determine which file has changed its contents. How it determines that information is by recording a hash (the file_content_hash field in the screenshot above ), which is basically unique for every contents. Once you edited a certain file and re-uploaded it, its hash will change. Next time you re-run scalp command, it will try to compare if the hash had changed, and if did not, it will "skip" it and wont re-index it to ElasticSearch. As a result, each time you run scalp command, only those files that is changed will going to be re-indexed, saving you valuable bandwidth and speed.

This allows you to conviniently schedule scalp command in cron, so it will detect any changed files and automatically re-index those.